
Last year, we bought several cages for our determinate variety tomatoes. The bottoms of the cages bent as we pushed them into the hard Georgia clay. Over the course of the season, the thin metal frames warped and lost their shine. Buying stronger, vinyl-coated cages for this year would have been an option but at $8 a pop we would've spent nearly $150 and the cages still might not be tall enough to fully support the plants.
I set the cages aside to support my pepper plants (which need less support anyway because the center stalk is so strong) and turned my attention to different support methods for tomatoes. After pricing out a variety of supports, my husband and I opted for the Florida Weave.
We first constructed 10' tall support posts that are built into the raised beds and buried 2' deep. (The visible support is 8' above the ground.) That sort of support post is not necessary but we felt they would be sturdier, longer lasting, and prettier since they were made of the same pressure treated pine wood as the raised beds. Some gardeners use metal T posts or U posts as supports. Those are strong and work fine but as the soil settles, thin metal posts can lean and look a bit messy.
We then drilled 1/2" holes into the posts.
.JPG)
In areas where we needed to make adjustments, we just drilled a few pilot holes and added 1/4" hooks. Doing this was safer than trying to bore 1/2" holes into the 4"x4" posts with the little plants around. If your measurements are right the first time and your posts line up perfectly, you won't need this step. But we aren't perfect!


The twine weaves in and out around each plant before circling back to bob and weave in the opposite direction. Overhead, the twine makes figure eights around each plant. Garden Betty put together an excellent overhead image of two spacing options. Ours is most like the first option. The second is recommended for much longer rows.
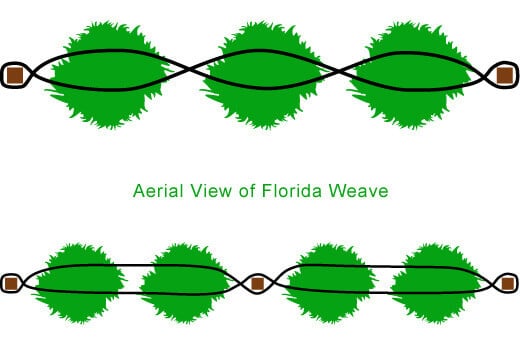
The horizontal and vertical spacing between the twine is debatable. Garden Betty, for example, opted to have each side of twine nearly parallel, so that the stem is cradled in the little gap. This spacing provides a lot of support for the stem but it will also require more twine. If woven too tightly, this arrangement can slice into the stem.
 |
| via Garden Betty |
Garden Betty has 8" between each vertical layer.
In our garden, each single line of twine is spaced about 6" apart. The stem is still nestled between the twine but in a but more of a relaxed S shape. As the plants get thicker and stronger, I don't think the spacing will be a problem.

Some gardeners, like The Kale Yard, have even more space between each line of twine, though the blogger admits that this isn't the best option. The twine was added after the plants were already quite large.
 |
| via The Kale Yard |
With any spacing arrangement, some plants will grow faster than others. In our case, one corner of the garden had three short plants among five taller ones. No problem. Just keep an eye on them and gently tuck them through the twine once they're tall enough.
.JPG)
I like the end result and I especially like the price tag! The posts were expensive at $12 each but since they're doubling as Florida Weave posts and emergency row cover posts, I'm pleased. 110' of twine costs less than $5. Overall, we will need about $15 of twine and we're done!
.JPG)
No comments:
Post a Comment